
When I was looking thru the Stampin’ Up new Holiday Catalog for the first time, I adored the Swirly Snowflakes Thinlet Dies! While playing in my craft room the other day I decided to make a card using them.
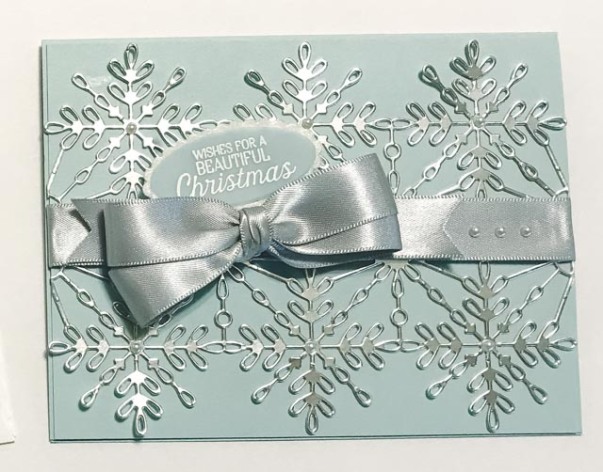
I cut the gorgeous snowflakes out of Silver Foil and them remembered I had the beautiful SU Silver Satin Ribbon! I thought it would go perfectly with the Silver Foil. So I cut a few pieces and wrapped one around the middle of the card. Cut some angles on the other piece and placed that on top a little to the left side. Then I tied a ribbon and placed that one top. The Sateen Ribbon is now on clearance for $2.80! So grab it while you can!
Then I was trying to decide what sentiment I wanted. While I was looking through the Sentiments of my stamp sets. I saw the “Wishes for a Beautiful Season” stamp from the Nature Sings Stamp set. Since I thought this card was going to be drop dead gorgeous! I thought..hmmmm a beautiful sentiment for a beautiful card! Yep, that’s the one!
To give my Sentiment a little Dimension I thought I would use the Layering Oval Framelits because the sentiment fit perfectly in one of the Ovals. First I took some of the Soft Sky Cardstock I used for the card and cut out an oval frame for the sentiment using double sided adhesive. I then covered it with White Glitter. I love sparkle on Christmas Cards! lol I stamped the sentiment on some Light Blue Vellum with Clear Embossing and emobssed It with Ranger White Embossing Powder. I then cut it out with the Layering Oval Framelits glued it to the Glitter base I made and added the framed sentiment to the card right above the ribbon.
Here is a tip!! To make a glittery embellishment. Cut out double sided adhesive just as you would regular cardstock. Remove one side of the adhesive, pour glitter on it..rub with your finger..and whooo la! You have a gorgeous glimmery embellishment and the glitter stays put! It doesn’t fall of at all! So Simple and Beautiful!
I decided I wanted just a little more pop. So, I took some Pearl Basic Jewels (that Amy Koenders gave me when I joined Stampin up. Thanks Amy!) and attached one in the center of the snowflakes and also added 3 to the right side of the ribbon.
I love to decorate the inside or outside of the envelope I send the card in. So I thought I would cut out the snowflake outline die that came with the set. I had some light blue glimmer paper I bought at Michael’s. (just because it was so pretty!) haha I adhered it to the envelope flap and used the die to cut it out. Boom! One gorgeous cut envelope in less than 4 minutes!

Here are the Stampin’ Up products I used to create this card.
Product List:


Other Items Used:
- Light Blue Vellum
- Ranger White Embossing Powder
- Double Sided Adhesive
I entered this card in the following Challenges:
- Just add Ink: Challenge – Texture
- Happy Little Stampers: Christmas -Sparkle
- CASEing the Catty – Christmas Around the World, pages 28-35
Update 10/2 – My card was the Winner this week at CASEing the Catty Challenge!


Oh my goodness, how pretty Barbara! The silver and blue color scheme is perfect, great design! 🙂
LikeLiked by 1 person
Wow, this is such a beautiful Christmas card Barbara! Such pretty colours and I love how your layer of satin ribbon and touch of vellum add an extra elegance too. Thanks for sharing with us at Just Add Ink this week.
LikeLiked by 1 person
Absolutely beautiful Barbara! So very elegant and pretty. Thanks for sharing at Just Add Ink.
LikeLiked by 1 person
Simple but elegant and pretty. Chantell Just Add Ink
LikeLiked by 1 person
What a great use of those dies! The silver ribbon is a great finishing touch to your gorgeous card. Thanks for sharing with us at Just Add Ink.
LikeLike
Such an elegant Christmas card! The shiny snowflakes look very beautiful, this die is stunning! Thanks for joining us at HLS September Christmas Challenge!
LikeLiked by 1 person
It is truly gorgeous, Barbara! Even though we are with Stampin’ Up!, I am glad to see someone besides me who uses other products as well. SU doesn’t have everything! (But what they have is the best!)
LikeLiked by 1 person
I agree Mary! I have so many craft products I have bought over the years. And it would be a shame not to use them after I spent our hard earned money buying them!😀
LikeLike
This is totally beautiful. I love it! 🙂
LikeLike
love your card. So beautiful.
LikeLiked by 1 person
Thanks Sharon!
LikeLike